Set Up Your Salesforce Org for Integration with MuleSoft
Estimated reading time: 7 minutes
When setting up your Salesforce Org for an effective and efficient integration with MuleSoft, there are a few integration tools that will be helpful in your integration journey.
In this article, we will be going over how to set up a Connected App with MuleSoft, and two ways to send messages regarding data changes from your Salesforce Org to MuleSoft.
Set Up a MuleSoft Connected App
First, let’s begin by setting up the MuleSoft Connected App in your org.
From Setup, search “App Manager” in the quick find box. This is where you will create a new connected app to host the secure connection between Salesforce® and MuleSoft®

The scopes that will allow this kind of access will:
- Provide access to your data via the web.
- Allow access to your unique identifier.
- Access and manage your data.

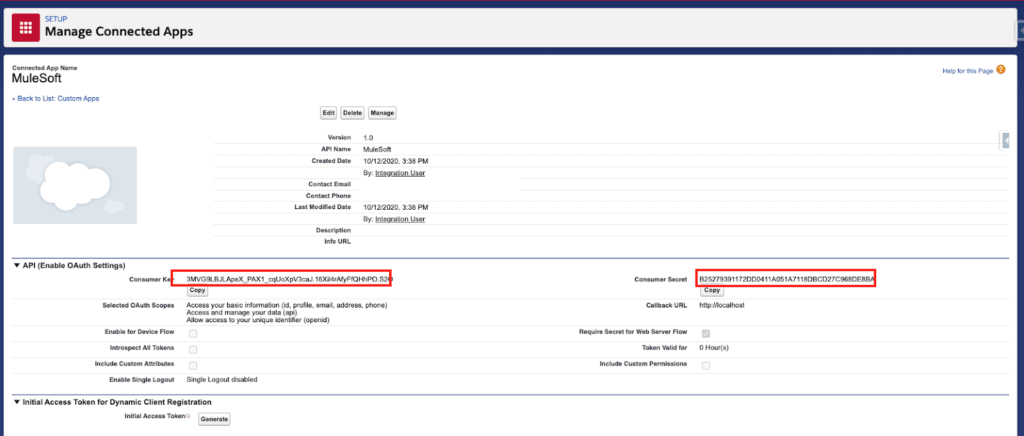
Once the connected app for MuleSoft has been created, you can search “Manage Connected Apps” and find the MuleSoft app there as seen below:

When you click “View” on your MuleSoft app in the Manage Connected App page, you will find the “Consumer Key” and “Consumer Secret,” which is required for connecting MuleSoft and Salesforce. Like the Integration User’s username and password, this will be in the configuration file in MuleSoft to establish a secure integration.
Quick Tip: To view the Consumer Secret, you will be asked to click “Click to Reveal” as it is a confidential key and crucial in establishing a secure connection.
With your connected app set up, you are ready to begin the journey of sending messages between MuleSoft and Salesforce.
Sending Messages Between MuleSoft and Salesforce
In order to explain this most thoroughly, let’s follow this example:
Your Salesforce org would like to have all contacts created or edited in Salesforce to be integrated with your legacy database system via MuleSoft. Each time a contact is created or edited in Salesforce, you need MuleSoft to make those changes in the legacy system as well. There are two ways to set this up inside of Salesforce:
- Platform Events and Process Builders
- APEX Classes
We will now go over the benefits and potential pitfalls of each of these.
Platform Events and Process Builders
A platform event is a component of the event-driven software architecture of Salesforce and external systems (in our case, MuleSoft). These systems pass messages through platform event messages, which are listened for in MuleSoft. Platform events must have a trigger inside of Salesforce to send that message to MuleSoft. This is where the Process Builder comes in.
Create a Process Builder to be triggered each time a Contact is created or edited. This will trigger the process whenever there is activity related to Contacts.
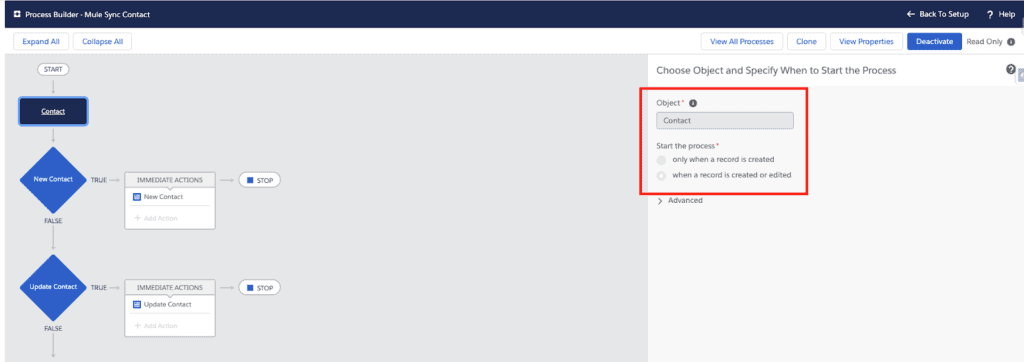
The Contact is either new or any of the fields are updated, so you should have a branch for each of those options.

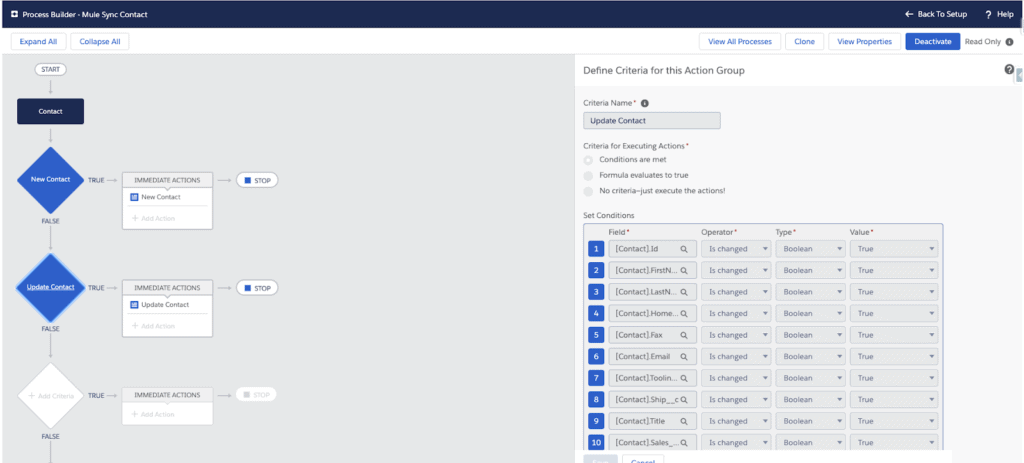
Quick Tip: Make sure you are listing each of the fields on the object you want to trigger an update in your integrated system. If someone updates a field that is not listed as part of the process builder, the message to update the contact will not be sent to MuleSoft.
These two options will go to an immediate action of either New Contact or Update Contact using the sObject (Platform Event) as a Record Type. This will fire the Platform event to send a message to MuleSoft with the Key, Method, and Object Type.

On MuleSoft’s end, there is a listener that is waiting for one of these Platform Event messages to come across and will fire the appropriate flow in response to the message it receives.
APEX Classes
An APEX Class can be configured to be an HTTP callout using the Salesforce REST API we talked about earlier. The HTTP callout will be easier to use, but will still require Salesforce development. An APEX Class is created in the Developer console and is written to receive the request from Salesforce regarding the change in data and send that message to a listener in MuleSoft, similar to the way the first option works. We highly recommend using Platform Events and Process Builders because they require significantly less Salesforce development time and are easier to maintain in the long run.
In addition, APEX Classes are only a good option for a limited number of profiles. The caveat of using APEX Classes is that each user must have permission to use the class. If you are using APEX Classes, this permission can be added in the profile permissions as seen below.
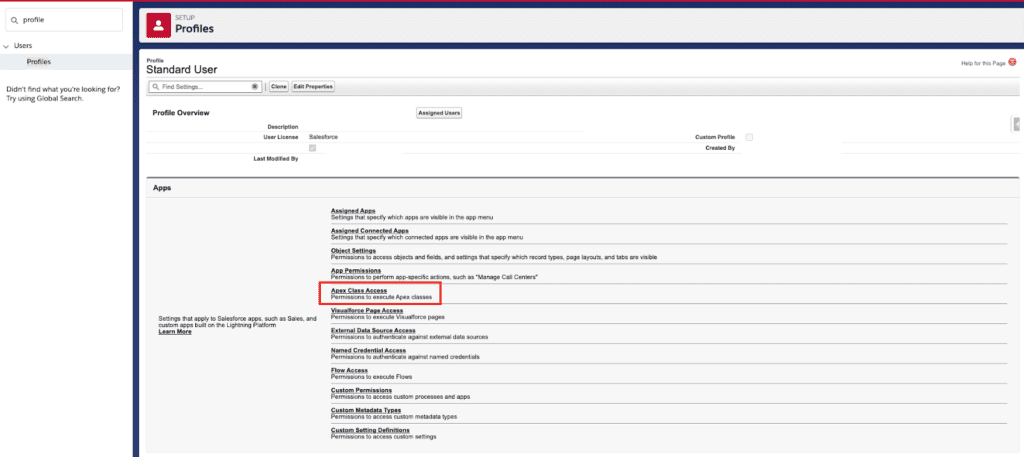
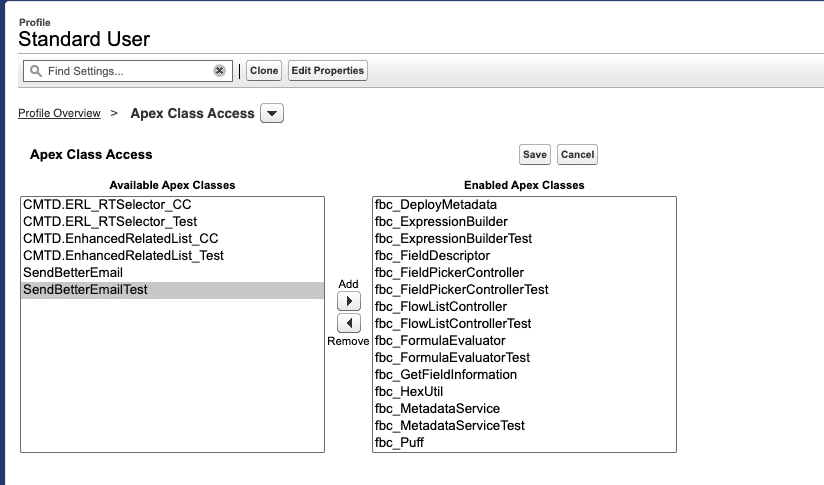
Once you click edit on the APEX Class Access page, you will be brought to the screen below, where you can change the selected Classes that the profile has permission to use. In order to trigger the APEX Class, the user must have a profile with access to the APEX Class.
Summary
Connected Apps, Platform Events and APEX code allow for efficient communication between Salesforce and MuleSoft. Connected Apps allow Salesforce to recognize the connection to MuleSoft. Platform Events or APEX code allow for communication to MuleSoft. This explicit process for setting up communication with your integration platform will allow for a manageable integration with MuleSoft. Following this article will allow you to fast track your integration setup. These steps will ensure that you have the foundation of your integration and the communication between MuleSoft and Salesofrce configured. With an effective integration foundation, you will be set up for a successful integration.
Ad Victoriam’s certified, experienced and passionate MuleSoft consultants team up with businesses to turn legacy point-to-point integrations into a scalable architecture that your business can grow with. How can we help your business today?
Related Resources:
