Marketing Cloud Intelligence Reports: A Deeper Dive
Estimated reading time: 5 minutes
What does every marketer want? Specific and actionable data to best connect with their target audience. Want to utilize Salesforce Marketing Cloud Intelligence, powered by Datorama, to find this data most efficiently? You’ve come to the right place.
Datorama Reports are available in Marketing Cloud Pro, Corporate, and Enterprise editions.
- Out-of-the-box functionality Datorama Reports includes: viewing built-in dashboards, creating and managing reports, and creating and managing pivot tables.
- Premium functionality with Datorama Reports Advanced includes: creating and customizing dashboards, creating and managing calculated measurements and dimensions, querying granular data, and viewing and installing cross-channel apps.
Data Basics
Before diving into Datorama Reports, make sure you know a few data basics:
- Data Retention: From the first time Datorama is activated in Marketing Cloud™, up to 90 days of historical data is readily available.
- Data Refresh: Data is refreshed daily, once per account every 24 hours at a variable time, unable to schedule.
- Data Retrieval: In the event of an error for data retrieval from Marketing Cloud to Datorama, users can continue to use existing data to retrieve reports while the process automatically retries every few hours.
- Data Deletion: When a contact record is deleted for one or more subscribers within Marketing Cloud, information is also removed from Datorama within 90 days. In accordance with the Marketing Trust and Compliance Documentation, all customer data is deleted when Datorama subscription is terminated.
- Data Elements Available:
- Dimensions: Descriptive non-numerical data, such as Audience Name and Email Sender IP.
- Measurements: Quantitative numerical data, such as Email Bounces and Email Deliveries.
Specific & Actionable Data Types
With that understanding of data basics fresh in your mind, discover the types of data you can utilize in Datorama.
Dashboards:
- Preconfigured Dashboards include: Email insights such as Overview, Deliveries, Engagement, Performance and Journey Performance; Push insights such as Deliveries, Engagement, and Performance and Journey Performance.
- Collections organize related dashboards together; linked components refer to send date (not event date).
- Trouble loading dashboards? Allowlist the Datorama domain/IP addresses for Datorama Reports. For more information, see IP Addresses for Inclusion on Allowlists in Marketing Cloud.

Pivot Tables:
- Out-of-the-box pivot tables include: Email – Daily Send Summary, Campaign Performance, Journey Performance, Campaign – Best Performing Send Day, and Email – Audience Engagement Over Time.

- User Permissions Needed:
- To create or export pivot tables: Access, View and Export, Schedule, “Create and Edit.”
- To save, edit, and delete pivot tables: “Create and Edit.”
Scheduled Reports:
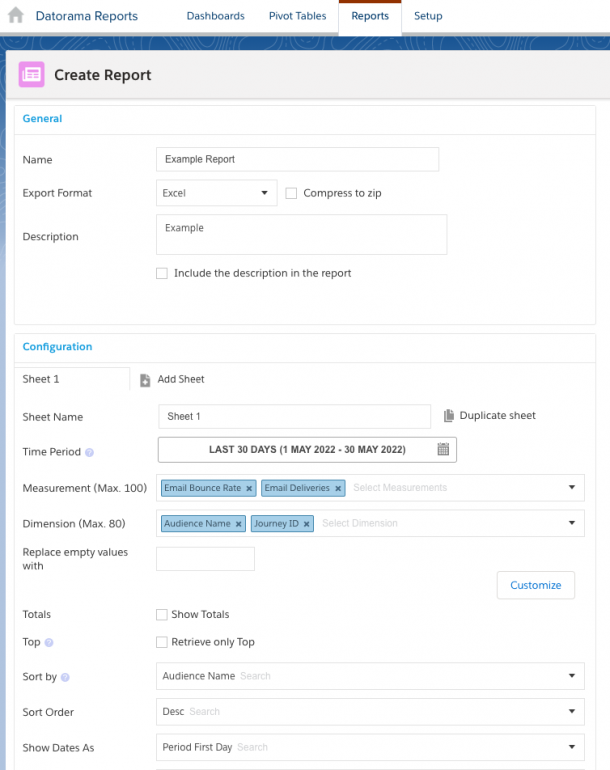
- Create and Schedule reports for recurring check-ins to your KPIs.

Dive In the Data
Ready to start curating your own actionable data? Follow the steps below to bring scheduled data to your Slack or inbox.
Dashboards:
- Customizing dashboards
- Apply Filters to modify viewable data: filter by dimension, measurement, or date dimension.
- Save filters with pre-configured views of dashboards as Interactive FilterSets.
- Add Widgets to visualize and utilize actionable insights.
- Sharing/Scheduling dashboard reports
- Share via Datorama Insights for Slack, email or download.

-
- Schedule reports of dashboard pages as PNG or PDF, filters cannot be applied.
Pivot Tables:
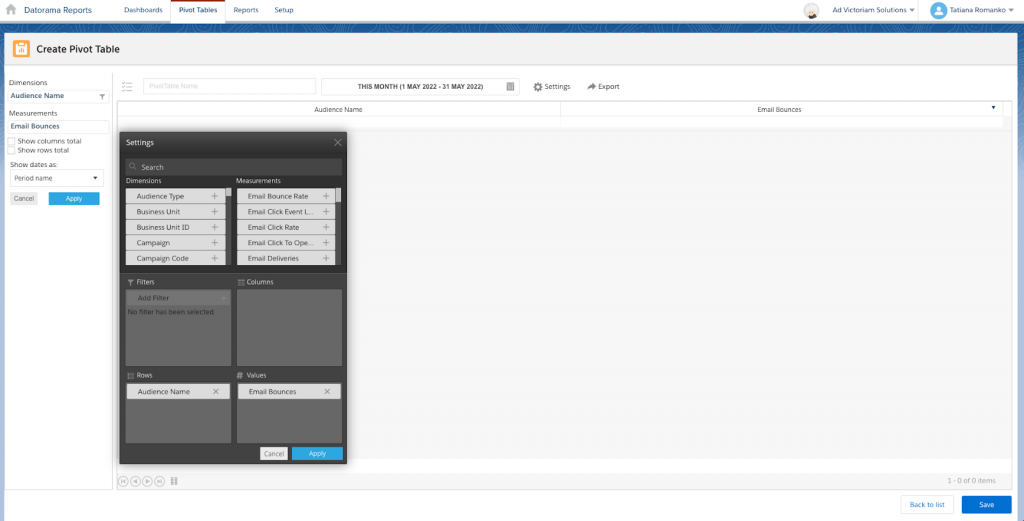
- Setting up a pivot table report
- Go to Analytics Builder, and select Datorama Reports.
- Select the Pivot Tables tab.
- Click Create New Pivot Table.
- Enter a name for the pivot table.
- Select the dates you want to pull data for.
- To set up the pivot table, click Settings.
- Define the dimensions and measurements.
- Select the dimension or measurement, and then drag.
- Select the dimension or measurement, and click plus icon
- Click Apply.

Scheduled Reports:
- Creating and scheduling a Scheduled Report
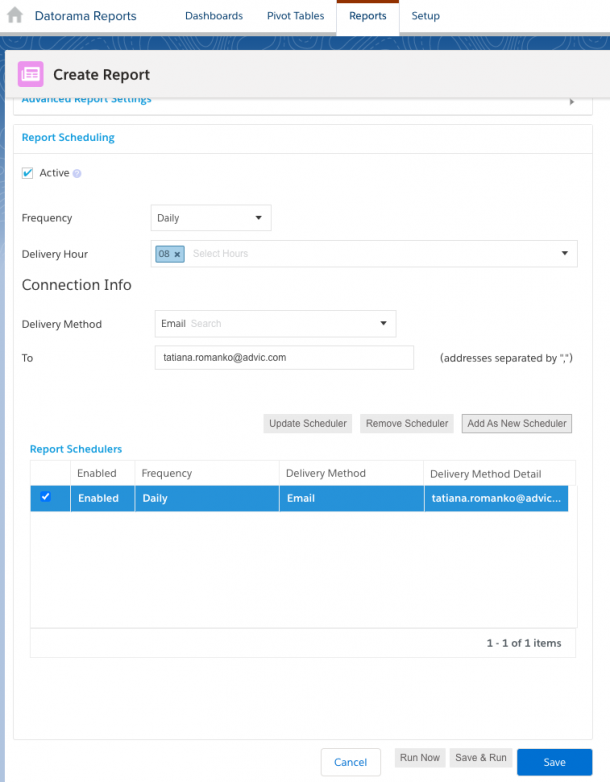
- Go to the Report Scheduling area.
- Select the Active checkbox. After you select this checkbox, all options are enabled.
- Select the Frequency dropdown.
- In Delivery Hour, enter the hour you want the report sent.
- By default, automatic is defined as 6 o’clock UTC.
- In the Delivery Method dropdown in the Connection Info area, select sharing method.
- Click Add As New Scheduler.
- Click Save and Run.

Delivery Methods:
-
- AzureBlob
- FTPS
- Google Drive
- HDFS
- SFTP
- AWS – S3
- Google Cloud Storage
Summary
Datorama Reports can help marketers glean the necessary information from dashboards, pivot tables, and scheduled reports to stay up to date on KPIs and make actionable decisions efficiently. Once filters and preferences are set, scheduler and delivery options bring the data to you in almost any way you could want!
AdVic® is a Salesforce® Partner who has the knowledge and capacity to consistently produce customer success for clients. After working with Ad Victoriam, clients significantly enhance their customers’ experience through the ability to automatically send customers down a dynamic journey with highly-targeted personalized messages via Salesforce Marketing Cloud™, and we can do the same for you. Contact us today.
Related Resources:
Marketing Cloud Interactive Email: Form Content Block
Maximize Your Marketing Cloud Data with Automation Studio
Subscribe to the AdVic Salesforce Blog on Feedly:


